Showing posts with label holiday projects. Show all posts

Monday, December 20, 2010

Homemade Candy Treats


What better to bring to your office during the week before Christmas than candy!

Caramel Marshmallow Balls
I got the recipe from here but my recommendation is to only use 3/4 cup butter (1 1/2 sticks). Also, be careful not to let the caramel burn.

Oreo Balls
Bob go the recipe from here.
Sugar-Free Chocolate Dipped Fruit & Pretzels
Stacy's recipe is here. Note that adding agave will make the chocolate more stiff/crumbly and less spreadable. The sweetness of the apples counters the slight bitterness of the sugar-free chocolate well, but pretzels are probably best left saved for regular chocolate only.
For more candy ideas, try:
Fudge and more

Tuesday, December 14, 2010

Sugar Cookie Gingerbread Sculptures/Houses


Stacy and I baked sugar cookies. They baked up a lot wider and rounder than expected.

  • To make the red and black cookies we used gel food coloring. We used liquid food coloring for the green cookies.
  • For the pine trees, we made 2 trees, cut one in half, and spackled with icing.
  • For the black tree, we made a small circle cookie, cut it in half, and used it as a tree stand.
  • For the Charlie Brown and Lucy cookies, we dyed white icing with food coloring to get yellow, blue, black and pink.
  • For our mortar/icing, we used white Betty Crocker Easy Squeeze Decorating Icing

Note: We'll add shaved coconut for snow to the Snoopy display. We use cake-takers to transport the cookies.

Sunday, December 12, 2010

Homemade Ornaments

We used yarn, ribbon, sewing pins and Styrofoam balls
to make these ornaments at a holiday party!
For design #1: Use thick ribbon, tie into 6 knots, close the loop, and add a bell.
For design #2: Pin pieces of three colors of ribbon into place on ball.
For design #3: Wrap three colors of yarn around Styrofoam ball.
For design #4: Wrap yarn around a paper ornament form.
For design #5: Wrap yarn around ball and secure with pins at top and bottom. Add extra pins and wrap yarn around them on side of ornament.
For design #6: Wrap ribbon around Styrofoam ball, securing with hot glue as needed, and finish with pins on top and bottom.
For design #7: Wrap thick ribbon vertically around ball and wrap a thinner ribbon around it.
For design #8: Use small design pins to secure a small bead and a sequin all over ball.

For more inspiration see this example and this other example.

Saturday, December 11, 2010

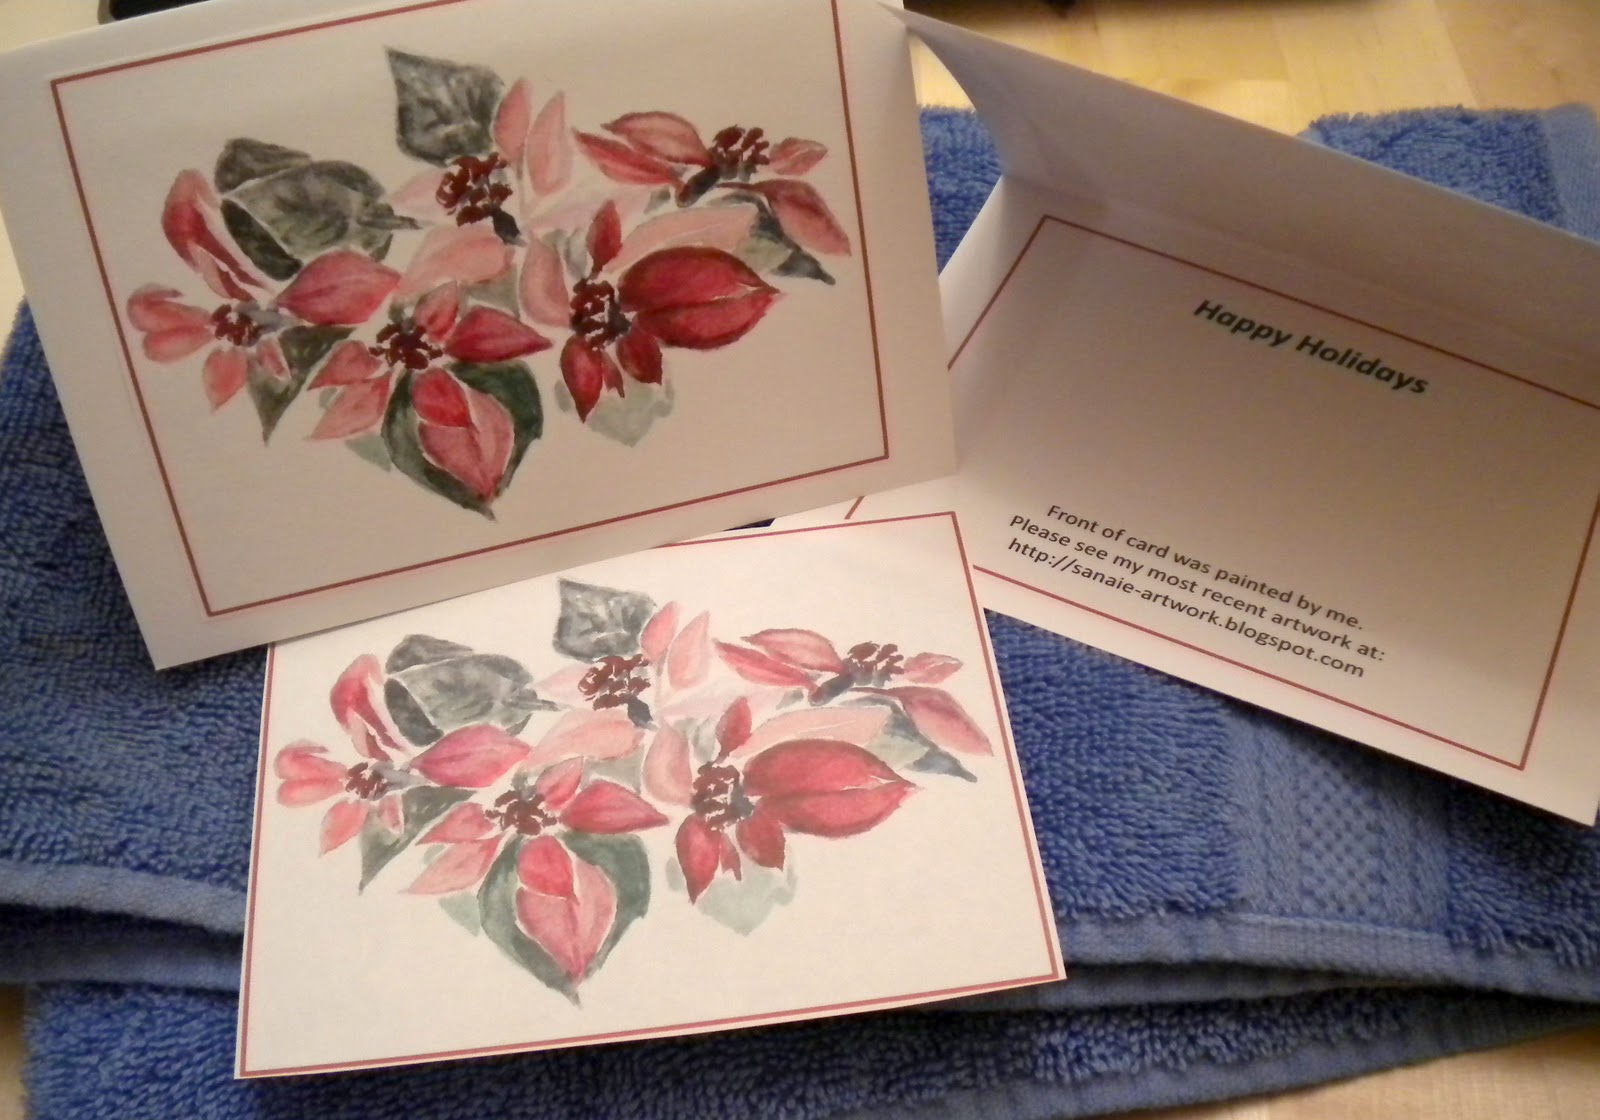
Home-Printed Cards

Steps to create these cards:
  1. Do a watercolor painting for the card's front, i.e. poinsettias.
  2. Scan the painting.
  3. Import the picture into Microsoft PowerPoint, resize to fit onto blank cards, and add a red outline*.
  4. Design a message for the interior of the card, i.e. "Happy Holidays"
  5. Print and cut out cover and card's interior. Secure to blank cards with a glue stick.
  6. Print out address labels if desired.
*Note: Outlining makes designs easier to cut out and apply evenly to the card.

    Monday, December 6, 2010

    Gifts Post - Gifts in a Jar, Pet Portraits, and Decorated Candles!

    Tonight was a choose-your-own-adventure night of crafts.

    Gifts-In-A-Jar by Stacy
    1-Pint jars she made:
    1-Quart jars she made:

    Candles by Bob
    She bought flameless candles** - just as great-smelling as regular candles but zero mess, zero stress. She decorated them by hot-gluing a thicker ribbon and then a thinner ribbon around the candles, finishing with a bow.

    Pet Portraits by Jess
    The portraits were created using watercolor paint. You can see them by clicking here.

    UPDATE: Jess finally made her gifts-in-a-jar too! It took 3 hours (surprisingly long).


    *Mexican Hot Cocoa Recipe for Pint-Size Jars
    • Ingredients to make 3 jars:
      • 5 cups powdered milk
      • 2/3 cup light brown sugar
      • 1/2 cup cocoa powder
      • 3 tsp powdered vanilla non-dairy creamer
      • 1 1/2 tsp ground cinnamon
    • To fill gift jars:
      • Mix all ingredients and divide equally among three pint-sized jars
      • Use tulle or other fabric on lid of jar and tie on a decorative bow
    • To make hot cocoa:
      • Combine 2 1/2 tbsp mix per 1 cup boiling water and stir
      • Each pint-size jar makes about 6 servings of hot cocoa

    For more gift-in-a-jar ideas, see this example and this other example and this further example and yet another example.

    **Note: "Flameless candles" are also called "electric candles" or "battery-operated candles." They have an LED light instead of a flame.

      Monday, November 29, 2010

      Holiday Wreaths

      For Stacy's Wreath
      See this example from Martha Stewart.
      Steps: Get a foam wreath shape and wrap it with green ribbon, securing ribbon with hot glue. Then make flowers with red ribbon - cut three strips and secure them together in the middle with floral wire to create a six-petaled flower. Hot-glue the flowers to the wreath and use white straight pins for the stamen. Afterwards, wrap small white ribbon around the entire wreath. Using larger ribbon, make three large loops and secure in the middle to make a large bow. To finish, tie three bells in the center of the bow.


      For Bob's Wreath*
      See this example from Eddie Ross.
      Steps: Open a wire clothes hanger. String copious amounts of ornaments onto the wire. Use smaller ornaments to fill in gaps. Finish with a bow like Stacy's.
      Optional: Before stringing ornaments, use hot glue to secure each ornament's metal hanger to its ball so the ornament cannot pop off. Wait until the glue is dry before stringing.


      For Jess' Wreath*
      See this YouTube example. Jess' wreath is similar to Bob's except it has a smaller circle (less ornaments) and it has a long metal and ribbon hanger.
      Steps: Thread medium-sized ornaments onto circle made from clothes hanger. Tie on smaller ornaments. Wrap large white ribbon around wire. Tie on more ornaments where needed for fullness using floral wire. Wrap white feather boa around wreath (you can use tinsel instead). Wrap ribbon around rest of hanger to form vertical wreath hanger and secure ribbon with hot glue. To finish, make a bow by forming two loops and use a small piece of ribbon to bind them in the middle.

      *Notes on Ball Ornament Wreaths:
      1) The Dollar Store is a great source for inexpensive ornaments.
      2) Consider getting Styrofoam ornaments because they can't shatter when dropped.
      3) Jess' wreath used 27 medium-sized and 20 small-sized ornaments. Bob's used at least 50 ornaments.

      Thursday, November 25, 2010

      Easy Thanksgiving Pies


      Here's how to make both a pumpkin and an apple pie and have them cook in the oven simultaneously.

      Single Crust (for pumpkin pie)
      • 1 1/3 cup flour
      • 1/2 tsp salt
      • 1/2 cup Crisco*
      • 3 tbs water
      Double Crust (for apple pie)
      • 2 cups flour
      • 1 tsp salt
      • 3/4 cup Crisco*
      • 1/4 cup water
      Apple Filling
      • 2 Granny Smith apples, peeled
      • 4 Macintosh apples, peeled
      • 1/2 of a lemon
      • 2/3 cup sugar
      • 1/4 + 1/8 tsp ground cinnamon
      • 1 pinch ground nutmeg
      Pumpkin Pie Filling
      • 1 (15 oz) can pure pumpkin puree
      • 1 (14 oz) can fat free sweetened condensed milk
      • 3 egg whites, lightly beaten
      • 1/2 tsp salt
      • 1/2 tsp ground cinnamon
      • 1/2 tsp ground nutmeg
      • 1/4 tsp ground ginger

      Directions
      1. Combine ingredients for pie crusts using a pastry blender and form into balls (1 ball for pumpkin pie, 1 ball for bottom of apple pie, 1 smaller ball for top of apple pie).
      2. Chill pie crust in refrigerator for one hour.
      3. For pumpkin pie: Combine all pumpkin pie filling ingredients.
      4. For apple pie: Slice apples into 10-12 pieces per apple, squeeze with lemon juice to keep fresh and combine sugar with cinnamon and nutmeg in a separate bowl.
      5. Remove bottom pie crusts from refrigerator and place into pie tins.
      6. For pumpkin pie: Add pie fillings.
      7. For apple pie: Add 1/2 of apple slices, add 1/2 of sugar mixture, add rest of apples, add rest of sugar mixture.
      8. For apple pie: Place top crust piece over pie and use beaten egg or cold water to attach it to bottom crust, then cut top crust to vent.
      9. Brush pie crusts with beaten egg or melted butter to encourage browning.
      10. Place both pies in 425 degree oven for 15 minutes. Next, bake both pies in 350 degree oven for 30 minutes.
      11. For pumpkin pie: Remove from oven - knife inserted in center should come out clean. Cool on wire rack. Store in refrigerator when cool.
      12. For apple pie: Increase oven temperature to 375 degrees and bake for 10 minutes - Crust should be golden brown. Remove from oven and cool on a wire rack.

      *Note 1: Use the bars of Crisco for easier measuring
      **Note 2: I actually baked these pies both at 375 degrees for 10 mins, then at 425 degrees for 15 mins, then at 350 degrees for 23 mins, removed the pumpkin pie, then baked the apple pie at 375 degrees for 10 mins to finish it off - the recipe above is easier.

      Tuesday, November 16, 2010

      Thanksgiving Turkey-Shaped Candies

      These were a lot of fun to make! Supplies:
      • Oreo Double-Stuffed Cookies
      • Tube of White Icing (use to hold candies together and for eyes)
      • Reeses Mini Peanutbutter Cups (use as tummies)
      • Milk Duds (use as heads)
      • Candy Corn (use whole candies as tail feathers and wings and trim candies to make beaks)
      Helpful Link: We got the idea from this Oreo Turkeys website.

      Photos:
      (Left) Turkey by Itself;
      (Right) Katie and Stacy w/ Turkeys

      Monday, November 15, 2010

      Easy DIY Greeting Cards


      With just your home computer, standard 8.5x11" paper and Microsoft Powerpoint you can create fast and easy cards. You can use photos and graphics off the web as long as you don't market your cards*. I like putting a big design on the front and a tiny design on the back of the card. Just print cards, fold them in half twice, and you're done!


      If you want your fold on top, click on this template.
      If you want your fold on the bottom, like I did for my Thanksgiving card, click on this template.

      *Note: If you profit in any way from your cards or use them commercially, using someone else's artwork is copyright infringement.

      Table Runners

      We sewed table runners for Thanksgiving!

      Table Runners
      For mine (left), I used one strip of about 1 1/4 yeards of heavy fabric cut 16 inches wide (2 of those inches were for seam allowances). I simply folded down where I was going to hem the edges with an iron and then sewed away.
      For Jen's, she used two different fabrics to make a revisible Thanksgiving/Winter table runner. She simply sewed the fabric right-sides together along three edges, turned the fabric right-side out, and hand-sewed the fourth edge.
      For Stacy's (bottom), she used two different fabrics too, but to make her runner extra long, she joined her fabric at the middle of her runner and sewed it together on the bias to make the seam less obvious.

      Simple Valance (to go with the Table Runner)
      I basically hemmed a rectangle then folded one long side over and sewed it to make a pocket for the rod to go through.

      Note: For heavy fabric, you may have to adjust/increase the tension on your sewing machine.


      Helpful link: Table Runner Tutorial

      Sunday, October 24, 2010

      Carving Halloween Pumpkins


      Procedure: We carved pumpkins. First we carved around the stems with a large knife, entered our pumpkins, then removed their seeds and gooey insides with a pumpkin-carving spoon. I lightly drew my design on my pumpkin with a brown marker, then cut it out with thin pumpkin-carving knives. Stacy printed her design out on her printer, traced her design by pricking through the paper, then cut out where she'd pinned with a pumpkin-carving knife.

      Pumpkins 4

      Design Credits:
      From left top row: T-Fighter Spacecraft by Neuralclone and AGirlCalledBob, Gotham City Skyline by Stacy, Ghost and Tombstone, Jack Skellington by Mox_E, Scary Cat by Jess, Batman by Nick

      Cat Credits: It's the notorious Froy from CrochetKitten.com!

      Tuesday, October 19, 2010

      Outdoor Halloween Decorations


      Stacy and Nick went all out with a Batman-themed house! You could modify their procedures to make a custom sign and projector image for any holiday.

      Arkham Sign: Make a template - you could use Adobe Illustrator software to print your template out in tile mode. Trace your template onto a styrofoam-like surface - Nick used a sheet of foam insulation from the hardware store. Next, cut your sign using foam-carving knives (the kind used to carve foam pumpkins). Finally, spray paint black. Be sure to use acetone-free spray paint or it will eat through your work (spray-test a small corner first). Even regular spray paint will eat up the foam a little. An alternative is painting the sign with tinted primer (tint regular primer with black paint) and then painting it black. Afix your sign to PVC pipe and secure pipe to the ground by sliding it over embedded rebar.

      Batman Symbol
      Easy Way: Use a high-powered lantern and foamcore board. Cut your design out of the foamcore and place in front of the lantern. Black out the other three sides of the lantern.

      Nick's Way (uses a projector, music and DVD authoring software): He made an Adobe Illustrator file of the bat signal and laid it down on a video track in Adobe Encore*. Then he placed his music (the score from the first Batman movie) on an audio track underneath it. He added a jumpback action at the timeline's end to go to the first chapter marker, thus keeping the 13-minute long video looping. He burned his new DVD and played it through a home TV projector via a DVD player that was contained in a cardboard construct. The player and projector were both set on a stool and plugged into an attached multi-adapter.

      *Note: Adobe Encore is a DVD authoring suite that comes with the CS4 Production Bundle. You could do the DVD step with iDVD on a Mac or the Windows equivalent.

      Sunday, October 17, 2010

      Spooky Halloween Curtains


      You will need: Muslin or similar white fabric, white chiffon or tulle, and black paint. We used Acrylic paint, but you could use indoor latex house paint. We also used a dropcloth underneath to catch paint that seeped through the fabric.

      Procedure: First, cut and hem muslin to fit your window. Next, paint your ghost or other shape onto muslin. Stacy used Adobe Illustrator software to print her design on paper in tile mode, traced her design onto her curtain with a Sharpie, and then filled it in with paint. I free-handed my designs directly onto my curtains with black paint.

      After your designs are completely dry, cut and hem the chiffon to fit your window and sew it to the muslin, layering it so that the chiffon goes over the painted side of your muslin. Attach your project to a curtain rod in any way you choose (you could use clips; I sewed tie-ribbons to mine; Stacy sewed a rod pocket into hers). Hang with the chiffon side facing out for a great spooky display your neighbors can see and appreciate.

      Sunday, August 15, 2010

      Tissue Paper Flowers

      For a fun party activity, why not make tissue paper flowers? If it's a holiday party, you can do them in holiday colors (ex. red and green).

      To make these flowers, take a sheet of tissue paper, fold it accordion style, secure in the middle with string*, then unfold. To see detailed instructions, visit Sew Sweet Stitches. You can make a vase of flowers or a garland!

      *Note: You can use raffia or floral wire to tie them.

      Sunday, March 28, 2010

      Easter Eggs

      Coloring Easter Eggs: Get food-coloring, plastic cups (for placing the eggs and dye in), eggs, and electrical tape. Use the tape to block out shapes/designs on your eggs. The taped parts won’t get dyed. You can also layer the effect – dye the whole egg, tape off some parts, then re-dip the egg in a different color. Another idea is to do gradients. Dip bottom half of egg in one color, wait one minute, and then dip the other half in a different color. You can get cool effects using even more colors.

      For those who do not know how to hard-boil an egg: place eggs in small to medium-sized pot filled 3/4 full with water. Add 1 teaspoon vinegar to pot to deter eggshell cracking. Bring water to boil. Let eggs boil for 10 minutes. Turn water off. Let eggs sit in the pot in the hot water for 10 more minutes. Drain water from pot. Place eggs in strainer and run cold water over them for 1 minute to halt cooking.

      Wednesday, February 3, 2010

      Valentine’s Day Cookies

      We followed the same process as we did for the Christmas cookies except that this time we also used a pink gel icing. The gel icing was not as fun because it dried more clear than pink.

      Note: Just like with the slim shape of the Christmas candy cane cookies, the lips-shaped Valentine’s Day cookies wound up more dry and less fun to eat. The lips shape also did not allow for as much creative freedom as the heart shape.

      Friday, December 18, 2009

      Christmas Cookies

      We rolled sugar cookie dough to 1/4 inch thick on a floured surface and cut them with flour-dusted cookie-cutters (to avoid sticking). After baking we decorated with red, green and white icing and chocolate chips and sprinkles.

      Note: The cookies shaped like gingerbread men were the most fun to decorate, followed by star-shaped cookies. Other shapes such as Christmas trees did not allow for as much creative freedom. Additionally, the slim width of the cookies shaped like candy canes made them cook a bit more than the other shapes, meaning cookies that were more dry and less fun to eat.