Monday, November 29, 2010

Holiday Wreaths

For Stacy's Wreath
See this example from Martha Stewart.
Steps: Get a foam wreath shape and wrap it with green ribbon, securing ribbon with hot glue. Then make flowers with red ribbon - cut three strips and secure them together in the middle with floral wire to create a six-petaled flower. Hot-glue the flowers to the wreath and use white straight pins for the stamen. Afterwards, wrap small white ribbon around the entire wreath. Using larger ribbon, make three large loops and secure in the middle to make a large bow. To finish, tie three bells in the center of the bow.


For Bob's Wreath*
See this example from Eddie Ross.
Steps: Open a wire clothes hanger. String copious amounts of ornaments onto the wire. Use smaller ornaments to fill in gaps. Finish with a bow like Stacy's.
Optional: Before stringing ornaments, use hot glue to secure each ornament's metal hanger to its ball so the ornament cannot pop off. Wait until the glue is dry before stringing.


For Jess' Wreath*
See this YouTube example. Jess' wreath is similar to Bob's except it has a smaller circle (less ornaments) and it has a long metal and ribbon hanger.
Steps: Thread medium-sized ornaments onto circle made from clothes hanger. Tie on smaller ornaments. Wrap large white ribbon around wire. Tie on more ornaments where needed for fullness using floral wire. Wrap white feather boa around wreath (you can use tinsel instead). Wrap ribbon around rest of hanger to form vertical wreath hanger and secure ribbon with hot glue. To finish, make a bow by forming two loops and use a small piece of ribbon to bind them in the middle.

*Notes on Ball Ornament Wreaths:
1) The Dollar Store is a great source for inexpensive ornaments.
2) Consider getting Styrofoam ornaments because they can't shatter when dropped.
3) Jess' wreath used 27 medium-sized and 20 small-sized ornaments. Bob's used at least 50 ornaments.

Sunday, November 28, 2010

Healthier Blueberry Scones Recipe

Stacy, Jen and I had a post-Thanksgiving meal (a "friends Thanksgiving") and I brought scones. Here's how I made them.
Dry Ingredients
  • 1 cup white flour
  • 1 cup wheat flour*
  • 1/4 cup sugar
  • 1 tbs baking powder
  • 1/4 tsp salt
  • 1/4 tsp baking soda
Wet Ingredients
  • 1/4 cup butter
  • 3/4 cup + 2 tbs low fat buttermilk
  • 1 egg
  • 1 tsp + 1/4 tsp vanilla extract
  • 1/4 tsp almond extract (can omit)
  • 1/4 tsp orange extract**
  • Zest of half a lemon (can use orange zest instead)
  • 1 cup blueberries***
Instructions - Makes 8 scones
  1. Preheat oven to 400 deg. F.
  2. Mix dry ingredients in a large bowl.
  3. Cut butter into dry mix using a pastry blender.
  4. Mix the remaining wet ingredients except for the berries in another bowl.
  5. Add the wet mix to the dry mix and stir to mix them together.
  6. Fold in the blueberries.
  7. Drop by large spoonfuls onto a parchment-lined baking sheet.****
  8. Bake for 18 minutes.
Notes:
*Instead of using 2 cups white flour, I used 1 cup of white and 1 cup of wheat to make these scones more healthy.
**Instead of using orange extract, you can squeeze a little orange or lemon juice in and reduce the amount of buttermilk.
***If using frozen blueberries, warm them to room temp by running warm water over them.
****Be gentle with this kind of dough - over-working it will make it tough.

Thursday, November 25, 2010

Easy Thanksgiving Pies


Here's how to make both a pumpkin and an apple pie and have them cook in the oven simultaneously.

Single Crust (for pumpkin pie)
  • 1 1/3 cup flour
  • 1/2 tsp salt
  • 1/2 cup Crisco*
  • 3 tbs water
Double Crust (for apple pie)
  • 2 cups flour
  • 1 tsp salt
  • 3/4 cup Crisco*
  • 1/4 cup water
Apple Filling
  • 2 Granny Smith apples, peeled
  • 4 Macintosh apples, peeled
  • 1/2 of a lemon
  • 2/3 cup sugar
  • 1/4 + 1/8 tsp ground cinnamon
  • 1 pinch ground nutmeg
Pumpkin Pie Filling
  • 1 (15 oz) can pure pumpkin puree
  • 1 (14 oz) can fat free sweetened condensed milk
  • 3 egg whites, lightly beaten
  • 1/2 tsp salt
  • 1/2 tsp ground cinnamon
  • 1/2 tsp ground nutmeg
  • 1/4 tsp ground ginger

Directions
  1. Combine ingredients for pie crusts using a pastry blender and form into balls (1 ball for pumpkin pie, 1 ball for bottom of apple pie, 1 smaller ball for top of apple pie).
  2. Chill pie crust in refrigerator for one hour.
  3. For pumpkin pie: Combine all pumpkin pie filling ingredients.
  4. For apple pie: Slice apples into 10-12 pieces per apple, squeeze with lemon juice to keep fresh and combine sugar with cinnamon and nutmeg in a separate bowl.
  5. Remove bottom pie crusts from refrigerator and place into pie tins.
  6. For pumpkin pie: Add pie fillings.
  7. For apple pie: Add 1/2 of apple slices, add 1/2 of sugar mixture, add rest of apples, add rest of sugar mixture.
  8. For apple pie: Place top crust piece over pie and use beaten egg or cold water to attach it to bottom crust, then cut top crust to vent.
  9. Brush pie crusts with beaten egg or melted butter to encourage browning.
  10. Place both pies in 425 degree oven for 15 minutes. Next, bake both pies in 350 degree oven for 30 minutes.
  11. For pumpkin pie: Remove from oven - knife inserted in center should come out clean. Cool on wire rack. Store in refrigerator when cool.
  12. For apple pie: Increase oven temperature to 375 degrees and bake for 10 minutes - Crust should be golden brown. Remove from oven and cool on a wire rack.

*Note 1: Use the bars of Crisco for easier measuring
**Note 2: I actually baked these pies both at 375 degrees for 10 mins, then at 425 degrees for 15 mins, then at 350 degrees for 23 mins, removed the pumpkin pie, then baked the apple pie at 375 degrees for 10 mins to finish it off - the recipe above is easier.

Monday, November 22, 2010

Handmade Books


Supplies
  • Bookbinding glue (can use any white glue)
  • Foam brushes (to spread glue)
  • Cardstock paper (for book pages and covers)
  • Scrapbook paper (for covers)
  • Paper-cutter and cutting mat (scissors work but are much slower)
  • Xacto knife (a box-cutter will work)
  • Book (to use as a base for drilling holes)
  • Electric drill
  • Ribbon (to bind book pages together)
  • Yarn needle
  • Stickers (optional)
Process
  • Cut letter-size paper or cardstock in half horizontally with the paper cutter to make your pages
  • To make your front cover, take a piece of letter-size cardstock and cut it in half. Then apply glue to it and wrap your decorative scrapbook paper around it. Secure your folded scrapbook paper with glue. Cover the inside of your cover with another sheet of cardstock and glue down for a finished look. Do the same for your back cover.
  • To attach all the pages together, drill three holes through the entire stack. Put a phonebook or other disposable book underneath to avoid drilling through your table.
  • Use the ribbon to tie everything together and finish with a bow.
  • Place the entire book under something heavy until it is completely dry, then crease the front cover so you can open your book easily.

Photos: Jessica's (top), Jen's (middle), Stacy's (bottom)

Tuesday, November 16, 2010

Thanksgiving Turkey-Shaped Candies

These were a lot of fun to make! Supplies:
  • Oreo Double-Stuffed Cookies
  • Tube of White Icing (use to hold candies together and for eyes)
  • Reeses Mini Peanutbutter Cups (use as tummies)
  • Milk Duds (use as heads)
  • Candy Corn (use whole candies as tail feathers and wings and trim candies to make beaks)
Helpful Link: We got the idea from this Oreo Turkeys website.

Photos:
(Left) Turkey by Itself;
(Right) Katie and Stacy w/ Turkeys

Monday, November 15, 2010

Easy DIY Greeting Cards


With just your home computer, standard 8.5x11" paper and Microsoft Powerpoint you can create fast and easy cards. You can use photos and graphics off the web as long as you don't market your cards*. I like putting a big design on the front and a tiny design on the back of the card. Just print cards, fold them in half twice, and you're done!


If you want your fold on top, click on this template.
If you want your fold on the bottom, like I did for my Thanksgiving card, click on this template.

*Note: If you profit in any way from your cards or use them commercially, using someone else's artwork is copyright infringement.

Table Runners

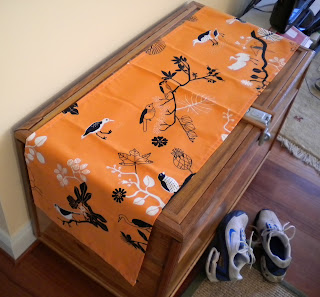
We sewed table runners for Thanksgiving!

Table Runners
For mine (left), I used one strip of about 1 1/4 yeards of heavy fabric cut 16 inches wide (2 of those inches were for seam allowances). I simply folded down where I was going to hem the edges with an iron and then sewed away.
For Jen's, she used two different fabrics to make a revisible Thanksgiving/Winter table runner. She simply sewed the fabric right-sides together along three edges, turned the fabric right-side out, and hand-sewed the fourth edge.
For Stacy's (bottom), she used two different fabrics too, but to make her runner extra long, she joined her fabric at the middle of her runner and sewed it together on the bias to make the seam less obvious.

Simple Valance (to go with the Table Runner)
I basically hemmed a rectangle then folded one long side over and sewed it to make a pocket for the rod to go through.

Note: For heavy fabric, you may have to adjust/increase the tension on your sewing machine.


Helpful link: Table Runner Tutorial